How to add Social Reviews to your Salon website

These are the steps to follow to add Social Reviews to your own salon website.

If you get stuck at any point - feel free to email us for help.

salon-reviews system

Sign-up and get listed on YourSalon.

Register your salon to get started!

You can either sign-up yourself on this page

Or fill in this request form and we will register your salon for you by visiting your website and collect the rest of the information including opening hours, description, address etc.

Once you listing is complete we will email you. This is an example of a salon listing - https://best-salon-guide.com/salon/amour-salon-salford/

We will also email to you your login information to YourSalon.co as this is where you will manage/approve your Reviews that will then appear on your own website.

add-reviews

Add Reviews onto your website

Simply add a new page and the code we send you.

If you have a website from Salon Guru - we do all the work- adding a new page on your website and the code to pull in your Salon Reviews.

If you DO NOT have a website from us - once your listing is complete we send you the embed code to pull the Social Reviews on YourSalon.co into your website. Please pass the code to your web designer and ask them to create a new Salon Client Reviews page.

You will also need to place on that page some text to explain how the system works. The embed code can be placed either before or after the text. These pages are good examples -

https://www.blisshair.com/reviews/

If you want a Salon Reviews image for your page, there are a number suitable in this dropbox we created

If you have any questions or problems - do not hesitate to email us.

salon reviews-words

How everything works

How to manage your Salon Reviews and post to facebook.

Once you have your listing on YourSalon.co and the code is embedded to your website - you can test Salon Social Reviews.

On your Reviews page...

  • Choose the number of stars and the comment.
  • Submit the Review.
  • Reviews are automatically approved (on YourSalon.co) and appear on this page.

On YourSalon.co after login...

  • Each Review is automatically approved and the salon is notified via email.
  • You can choose to post any review as the salon to your own page on Facebook.
  • Clients get a thank you email that you can edit to also be a voucher.
  • YourSalon.co has a Settings page where you can edit EVERY part of the process.
  • NEW SalonIQ users can have their client feedback automatically added as Reviews every night.
  • NEW you can choose that 4 & 5 stars reviews will get an email a few days later to leave a Google review.
salon-reviews-settings

The features & settings of Social Reviews

Understand the many great features of Salon Social Reviews

Once you log into YourSalon.co admin has 2 main parts...

Settings

reviews settings

The 1st setting on this page is your Notification email. This is the email address that will be notified of new Reviews. This can be multiple emails separated by commas.

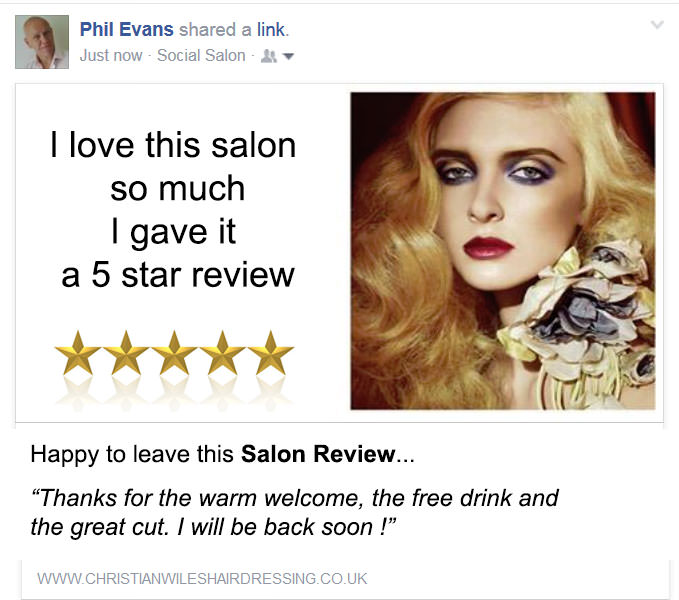
On this page you can also decide what is posted to your Salon's Facebook page (OG Data). It has 4 elements

  1. a Link to your website Review page
  2. a Title like “a great salon Review“.
  3. a Picture url – this gallery has suitable salon/hair images so you can change at any time. Just add the image link in Settings.
  4.  the Description - this is auto-filled with the client’s review

salon-review

Default Avatar

The reviews on your salon website page will have the name and a small Facebook profile image or Gravatar of the client that left the review. The default image set here will be used if a Facebook or Gravatar image can not be found.

Meta Data Values

These are used by Google to index your reviews page correctly.


View Reviews

On this page you manage the Reviews that have been left. There are 4 buttons on the right hand side of each review.

Edit - lets you make corrections of spelling or other changes to what the client wrote.

Dispute - if there is a less favourable review, you can mark it as 'in dispute' while the issue your customer has is dealt with

Refresh & Share - These 2 work hand in hand -

Refresh - Before you Share a review on your Facebook page it is best to hit the 'Refresh' button first, so that Facebook will share up to date data.

Share - the Facebook share dialog will appear in another, smaller, window.

Facebook dialog

NOTE: Before you login to post as the Salon to your page, you need to be logged into facebook as an ADMIN of the salon page.

In the first drop down select 'Share on a page you manage' - If you are not logged in to Facebook with the salon page admin account, you will not see this.

In the second drop down select the salon Facebook page you want to share the review to.

Add your own comments. This is optional.

Click 'Post to Facebook'. The review will then be posted on to your salon's Facebook page.

FB Page post 2

Once you've finished posting the review, close the Facebook window. You will see a prompt on your YourSalon reviews page asking if the review posted correctly.

shared

If it did not post correctly, click 'NO', the the 'Refresh' button, and then try to post it again.

If it did post coreectly, click 'YES'. The 'Refresh' & 'Share' buttons will be replaced with text saying 'Shared'